Targeted DDA in XCalibur
Table of Contents
Intro
Running data-dependent acquisiton (DDA) mass spectrometry experiments in targeting mode is very powerful and desirable if you are trying to get around the bias towards more intense ions inherent in the data-dependent algorithm. For single cell proteomics methods (SCoPE-MS, mPOP) especially, where short methods and long injection times yield at most 10K MS/MS events per experiment, we may need targeting in order to analyze low-abundance pathways of interest.
Of course SRM/PRM methods are more sensitive, but they’re more limited in the number of proteins analyzed – targeted DDA is a nice middle ground to get what we want and a lot of it too.
MaxQuant.Live (link to manuscript) is a great alternative to targeted DDA in Xcalibur, but it does require some extra set-up and tuning. Targeting in Xcalibur is less powerful, but may be more convenient for some users.
Background
Conventional DDA performs a survey scan (MS1 scan) on all ions passing through our MS, and then selects the N most intense ions (“Top N”) to analyze sequentially. It only will select an ion if it is not on an exclusion list and if it passes the AGC Min threshold. The algorithm will then accumulate the ion in an ion trap until either 1) the accumulation time hits the maximum injection time (IT) or 2) the number of ions hits the AGC Max threshold. Only then will the collected ions be released into the mass analyzer.
When we put DDA into targeting mode, we give it a list of ions to look at. Instead of picking the N most intense ions after a survey scan, it will pick the N most intense ions that are also on the provided list of ions. These ions still have to pass the AGC Min threshold and the accumulation procedure is the same for non-targeted DDA.
Building the List
Getting the Data
In order to tell the instrument to target ions, we must first identify them. You can build a targeting list from previous runs, but if these previous runs were run on conventional non-targeted DDA methods then we will be passing the instrument a list of the most abundant ions – defeating the purpose of running targeted DDA in the first place.
We want to analyze and sequence as many ions as we can, especially low-abundnce peptides that would normally be ignored by Top N DDA. We also want to match LC-MS/MS conditions as best as possible to the eventual targeted run, so fractionating or running a super-long gradient is not optimal.
To achieve this, we can:
1) Run the sample of interest a few times back-to-back, but before each run add the IDs from the previous run to an exclusion list. While the first run will select only the most abundant ions, each successive run will select less and less abundant ions. Generating an exclusion list is almost the same process as generating the inclusion list, which is explained below.
2) Run a bulkier sample with instrument settings tuned to maximize IDs at the expense of quantification quality. For low-abundance TMT sets, for example, this could mean decreasing the max injection time and tuning the NCE to maximize identifications instead of to maximize the number of TMT reporter ions (normally: 33 NCE → 28 NCE)
Generating the List
All we have to provide the MS with for targeted DDA is 1) the target m/z, 2) the retention time window, and 3) the target ion’s charge. These are all fields that we can find from search results, such as from the evidence.txt output from a MaxQuant search. Reformatting your data is then as simple as a short script or copy/pasting columns in Excel.
Our lab uses MaxQuant, but since many of our experiments are TMT-tagged, and since MaxQuant does not calculate masses and m/z correctly for TMT-labelled peptides, we have to calculate the mass on our own. I wrote a script to do this and a few other useful things, such as simple retention time alignment. You can find it here: https://gist.github.com/atc3/84c35bc900f746fa21a558e278efc67c
Running the Experiment
In XCalibur, open the Methods Editor and go to the tab for your mass spec. At the top of the MS method, click on “Global Lists”:
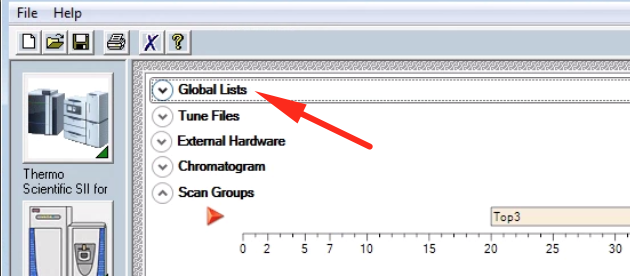
From here you can specify inclusion and exclusion lists, among others. Click on “Inclusion List” to edit the method’s inclusion list.
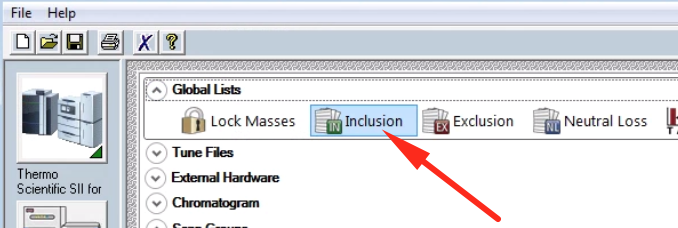
A dialog box should pop up with an excel-like editable table.

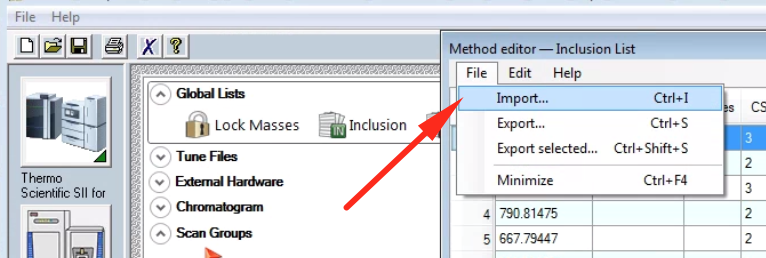
If you don’t want to enter in values manually, you can import a .csv (such as the one generated with my script linked above)
Instrument Settings
To turn inclusion on, simply set the “inclusion” parameter to on in the method properties sidebar.

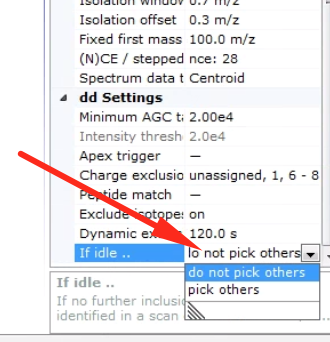
One other important behavior is what the instrument should do when it can’t find anything on the inclusion list. Should it do nothing? Or go for other peaks anyways? To expose this option first switch into advanced user mode, in the method properties sidebar:
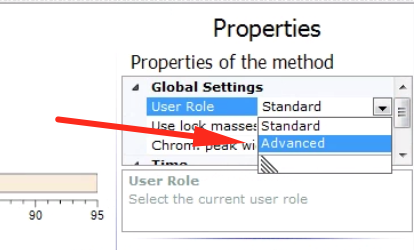
Then at the bottom you can choose your desired behavior.
Appendix
Thanks to Ed Emmott for help & knowledge.
Inclusion List Format
Details taken from a QE-Plus software manual and the XCalibur help pages.
Mass [m/z]: Enter the mass-to-charge-ratio of the inclusion mass into the field (with a maximum of five decimals). NOTICE: If you use the Mass Calculator to edit the Formula field, this field is automatically updated when you exit the editor.
Formula [M]: Use this field to describe the structure of the active compound. In addition to chemical formulas, you can enter amino acid sequences (one letter code) and peptide sequences (if they are structural terminated by H2O). The different ways of definition are called formula types. You can either enter the formula directly or use the Mass Calculator. To display this editor, click the down arrow in this field.
If more than one formula type for your input is possible, the Method Editor chooses the type with the highest priority (chemical formula > peptides > amino acids). Peptide sequences are marked by the prefix “p:” (for example, p: MRFA with m/z = 524.26496), amino acids by the prefix “aa:” (for example, aa: MRFA with m/z = 506.25440). Enter a prefix directly with the formula to ensure that the right type is applied.
Pay attention to the following restrictions:
• When you enter a valid formula, the Method Editor will set the default values for charge state (1) and Species (+H/-H). Then it will display an automatically calculated value in the Mass [m/z] field.
• When you enter a formula that the Method Editor cannot interpret, the Mass [m/z] field will stay empty. When you save the method, the Method Editor will warn you that the method is not in the shape to be executed (due to the missing m/z value). When you reopen the method, the Method Editor will display exactly the formula that was entered.
• When you enter a formula, The Method Editor requires a value for the charge state to calculate an m/z value. You can, however, save the method without specifying a charge state for the entry. When you save the method, the Method Editor will warn you that the method is not in the shape to be executed (due to the missing charge state). When you reopen the method, the Method Editor will display exactly the formula that was entered.
• Entries of compounds with calculated m/z values outside the measurement specifications of the mass spectrometer (m/z=50–6000) can be saved in an instrument method. The instrument software, however, will ignore these entries when it executes the method.
• When you change the m/z value that was calculated for the given set of formula, species and charge state, the Method Editor will clear the formula and species definition. The charge state will be preserved.
• When you change the polarity for a set of calculated m/z, formula, species and charge state, the Method Editor will clear the Mass [m/z] field if the species definition is not valid for this polarity. You then need to change the species definition.
Species: Use this text field to define adducts or modifications of the active compound that are expected to be formed. The default value is +H for positive polarity and –H for negative polarity. The Method Editor will then recalculate the value in the Mass [m/z] field, if possible.
The Species field can be used in two ways:
• Click the down arrow to display a list of predefined adducts for each polarity:
- +H, +Na, +K, +NH4 for positive polarity
- -H, +Cl, +OH, +HCOO for negative polarity
- an empty entry to express adducts (for example, radical cations) for both polarities.
The corresponding set will be displayed depending on the selected polarity.
Selecting an adduct (A) will result in the strict behavior of applying one unit A to the compound and using “+H” or “-H” adduct depending on the charge state and active polarity.
“+K” = [M + K+ + (z-1)H+]z+; for example, MRFA, +K, CS=2, positive pol. = [M + K++ H+]2+
Enter the modifications of the compound by using squared brackets and at least M as representation of the basic compound (for example, [M + Na + K] or [2M + Na]). The predefined adducts can be entered, too. This definition is used without additional auto dependencies, like adding protons.
NOTICE: If you use the Mass Calculator to edit the Formula field, the Species field is automatically filled when you exit the editor.
CS [z]: Use this spin box to enter the charge state of the ion to be fragmented. The valid range is 1–25. The required collision energy for fragmenting an ion depends on its charge state. The higher the charge state, the lower the required collision energy. If this field is left blank, any charge state will be accepted, even unassigned.
NOTICE If you use the Mass Calculator to edit the Formula field, this field is automatically updated when you exit the editor.
Polarity: Use this list box to toggle between positive ion and negative ion polarity. During a scan, the mass spectrometer uses only the inclusion masses with a polarity that matches the active ion mode.
NOTICE If you use the Mass Calculator to edit the Formula field, this field is automatically updated when you exit the editor
Start [min]: Enter the start of the time window (in minutes) that corresponds to the mass in this row. Alternatively, you can enter a time in seconds (by appending the letter s) or in hours (by appending the letter h). The software automatically converts your input into minutes.
End [min]: Enter the end of the time window in minutes. Alternatively, you can enter a time in seconds (by appending the letter s) or in hours (by appending the letter h). The software automatically converts your input into minutes.
(N)CE: Use the spin box to enter a potential gradient in the HCD cell used to fragment ions. The default collision energy is 35 eV. In the list box, specify whether absolute collision energy CE [eV] is used or normalized collision energy NCE is used. The valid range is 10 to 200 eV for CE or 10 to 200 for NCE. In the list, the software adds the prefix “ce:” to collision energy values (for example, ce:35).
A high collision energy value results in more energy deposition (which generally leads to more fragmentation). A low collision energy value results in less energy deposition (which generally leads to less fragmentation).
MSX ID: Enter the number of the multiplexed scan event in which the inclusion mass was analyzed.
Comment: Enter a comment for the inclusion mass into the field (for example, the compound name). This field is optional.
Related Posts
← Back to home